[ad_1]
Dealing with a leaking hot water tank is a common yet urgent household issue that requires immediate attention. This comprehensive guide delves into the various causes behind water tank leaks, ranging from aging tanks and corrosion to malfunctioning components.
Understanding these causes is crucial for timely diagnosis and effective resolution. We will also explore practical solutions and preventive measures, ensuring homeowners can efficiently address and avert potential water damage. This article aims to help you maintain a safe and functional hot water system in your home by equipping you with the necessary knowledge.
Why Is Your Hot Water Tank Leaking?

Old Tank
Aging is a primary factor in a leaking water heater. As water heaters typically last about 10 to 15 years, their internal components begin to wear down with age. This deterioration often leads to inefficiencies and leaks.
Signs that an older tank might leak include rusty water, inconsistent water temperatures, and unusual noises during operation. Corrosion, especially around the base of the tank, is a common issue in older models, directly contributing to leaks.
Malfunctioning Drain Valve
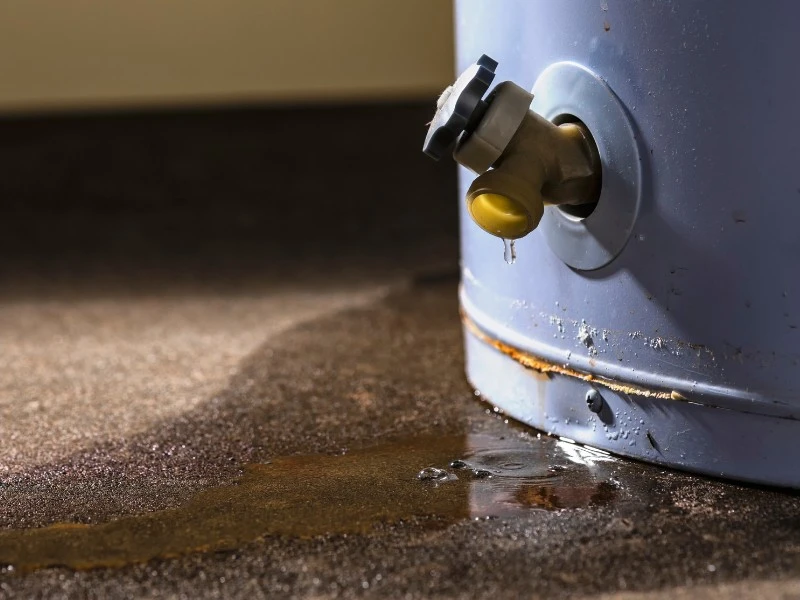
A malfunctioning drain valve is a frequent reason for a hot water heater leaking. This valve, essential for draining the tank during maintenance or repairs, can become faulty over time. Leaks typically occur if the valve fails to close properly, often due to wear, damage, or sediment buildup.
A faulty valve may lead to a slow drip or a steady stream of water, usually evident at the tank’s base. Identifying a malfunctioning drain valve early is crucial, as it can prevent water wastage and potential damage to the surrounding area.
Excessive Pressure
High pressure in water tanks is a significant factor in causing leaks. When the water pressure inside the tank exceeds its designed threshold, it puts undue stress on the tank’s structure and fittings. This excessive pressure can arise from a malfunctioning pressure relief valve or high incoming water pressure.
Over time, the strain from the high pressure can lead to the formation of cracks or the weakening of welds and joints in the tank. These structural compromises eventually result in leaks, which can be both sudden and severe.
Corrosion
Sediment buildup in hot water tanks, often resulting from hard water, leads to rust and corrosion, significantly impacting the tank’s integrity. Over time, minerals and debris settle at the tank’s bottom, causing rusting and corroding the internal lining.
This corrosion creates weak spots in the tank, making it more susceptible to leaks. Regularly flushing the tank can help mitigate sediment buildup, but if left unchecked, this issue can shorten the tank’s lifespan and lead to costly leaks and potential water damage.
Temperature Pressure Relief Valve
The Temperature Pressure (T&P) Relief Valve is a critical safety feature in water heaters, designed to release water and lower pressure if either the temperature or pressure inside the tank becomes too high.
This prevents potential tank explosions due to overpressure. Common issues with the T&P relief valve include it becoming stuck, corroded, or worn out, which can lead to it either leaking or failing to open at crucial times.
Anode Rod Degradation
The anode rod in a hot water tank plays a crucial role in preventing tank corrosion. Made of magnesium or aluminum, it acts as a sacrificial rod, attracting corrosive elements in the water. This protects the tank walls from corrosion.
However, over time, the anode rod deteriorates. When it fails or wears down significantly, it can no longer protect the tank, leading to rapid corrosion and rusting of the tank’s interior. This corrosion is a leading cause of leaks and tank failure.
How to Diagnose and Stop a Leak
Step 1: Power Off
In the event of a leak in your hot water tank, it’s crucial to safely disconnect power to the unit, whether it’s electric or gas-powered.
- For Electric Water Heaters:
- Locate your home’s circuit breaker box.
- Identify the breaker dedicated to the water heater.
- Switch off the breaker to cut power to the heater. This step ensures safe handling and prevents any electrical hazards.
- For Natural Gas Heaters:
- Find the gas supply valve near the bottom of the water heater.
- Turn the valve to the ‘off’ position, which stops gas flow to the unit.
- Turning the thermostat to the ‘off’ position is also advisable for added safety.
Remember, safety is paramount. If you’re unsure about any step or feel uncomfortable handling these components, especially in a leak scenario, it’s best to contact a professional. They can ensure that power and gas are safely disconnected and address the leak.
Step 2: Water Supply Off
When dealing with a leak in your hot water tank, promptly shutting off the water supply is crucial to prevent further damage. Here’s how to do it:
- Locate the Cold Water Inlet: Find the cold water inlet pipe leading to your hot water tank. This pipe typically has a lever or a knob-style shut-off valve.
- Shut Off the Valve:
- For a lever-type valve, Turn the lever perpendicular (at a 90-degree angle) to the pipe. This action cuts off the water supply.
- For a knob-style valve: Turn the knob clockwise until it’s tightly closed, which stops the water flow.
- Check for Further Leakage: After turning off the valve, observe the tank for a few minutes to ensure that the water has stopped leaking. If the leak continues, additional issues may require professional attention.
It’s important to act swiftly but carefully when shutting off the water supply. If the valve is difficult to turn or if you’re unsure about the process, it’s advisable to contact a professional plumber to avoid causing any further damage.
Step 3: Drain the Tank
To safely drain your hot water heater, follow these steps:
- Connect a Hose to the Drain Valve: Attach a garden hose securely to the heater’s drain valve to prevent leakage.
- Run the Hose to a Drain or Outside: Lead the hose to a nearby floor drain, sump pit, or an outdoor area where hot water can be safely disposed of without causing any damage.
- Open a Hot Water Faucet: To facilitate the draining process, open a hot water faucet inside your home. This helps reduce the vacuum in the system, allowing water to flow freely from the tank.
- Open the Drain Valve Carefully: Gently open the drain valve. Be cautious, as the water coming out will be hot. Take necessary precautions to avoid burns.
- Drain the Tank: Allow the hot water to flow until it runs clear. This step effectively removes sediment from the bottom of the tank.
- Close the Drain Valve Securely: After completing the draining process, firmly close the drain valve to prevent any leaks.
- Ensure Complete Draining: Verify that no water is left inside the tank, especially if there is a significant leak.
- Disconnect the Hose: Remove the garden hose from the drain valve and ensure that the valve is tightly closed.
Step 4: Inspect and Repair
- Inspect the Tank: With the water supply turned off and the tank drained if necessary, conduct a thorough inspection of the tank, paying attention to different zones.
- Identify the Source: Carefully examine the tank to pinpoint the source of the leak, which could be a loose fitting, a faulty valve, or another issue. Check the following areas:
- Bottom: Look for any signs of leakage or puddles at the base of the tank.
- Sides: Examine the sides of the tank for any visible cracks, rust, or wet spots.
- Top: Inspect the top of the tank, including the connections and valves, for any signs of leaks or damage.
- Make Necessary Repairs: Immediately make the required repairs once you’ve identified the problem. This might involve tightening loose fittings or replacing damaged components, ensuring a swift resolution to the issue.
Step 5: Refill the Tank
After successfully addressing the source of the water heater leak, it’s time to refill the tank and restore your hot water supply. Here are the steps to follow:
- Close the Drain Valve: If you open the drain valve during the leak repair process, ensure it’s tightly closed to prevent any water from escaping.
- Turn On the Cold Water Supply: Slowly turn the cold water supply valve back on to allow water to flow into the tank. This process refills the tank with cold water.
- Open a Hot Water Tap: To help release air trapped in the system and allow water to flow freely, open a hot water tap in your house. This ensures that air doesn’t block the flow of water into the tank.
Monitor the Tank: Keep an eye on the tank as it refills. Check for any signs of water heater leaks around the repaired area and ensure that water is entering the tank smoothly.
Step 6: Turn the Power or Gas Supply Back On
After successfully repairing the leak and refilling the tank, it’s time to restore power or gas supply to your water heater. Here are the steps to follow:
- Ensure the Tank Is Full: Confirm that the tank has been completely refilled and that there are no more air bubbles coming from the hot water tap.
- For Electric Water Heater: Locate your home’s circuit breaker box and identify the breaker dedicated to the water heater. Switch it back on to restore power to the electric heater.
- For a Natural Gas Heater: Find the gas supply valve near the bottom of the water heater. Turn the valve back to the ‘on’ position to allow gas flow to the unit.
- Relight the Pilot Light (Gas Heaters): If you have a gas water heater and have turned off the gas supply, make sure to relight the pilot light according to the manufacturer’s instructions.
Step 7: Check for Water Heater Leaks
Having addressed the leaky water heater and restored power or gas supply, it’s crucial to thoroughly inspect your water heater for any signs of new leaks. Here’s how to do it:
- Visual Inspection: Carefully examine the bottom, sides, and top of the tank, especially focusing on the repair area.
- Check Fittings: Inspect all fittings, valves, and connections for any moisture or drips.
- Observe the Floor: Look for any water pooling around the water heater’s base.
Congratulations, you’ve effectively resolved the issue if you don’t observe any water leaks, and the water heater operates as expected. However, it’s essential to remain vigilant and keep an eye on your water heater’s performance to catch any potential problems early.
Step 8: Call a Professional if Needed
While addressing a leaking water heater, if you encounter uncertainty or the issue persists even after your repair attempts, it’s prudent to reach out to a licensed plumber for expert assistance. Here’s why:
- Complex Issues: Professionals possess the knowledge to diagnose and rectify intricate problems that might not be apparent to the untrained eye.
- Safety Assurance: Plumbing systems involve electricity, gas, and water, making safety paramount. Plumbers are well-versed in safety protocols, ensuring no hazards.
- Reliability: A licensed plumber can provide lasting solutions, preventing future leaks and potential damage.
By seeking professional help when necessary, you ensure your hot water system’s optimal functionality and safety.
Preventive Measures To Avoid a Leaking Water Heater

Proactive measures and regular maintenance are essential to minimize the risk and damage of hot water tank leaks. Follow this concise guide for effective preventative strategies:
Regular Inspections: Frequent checks for moisture, corrosion, or unusual noises can detect issues early, preventing major problems.
Annual Maintenance: Yearly servicing includes inspecting the anode rod, ensuring T&P relief valve functionality, and checking for wear or leaks.
Sediment Flushing: Remove sediment buildup through annual tank flushing to maintain efficiency.
Pressure Monitoring: Keep an eye on water pressure and consider a pressure-reducing valve to prevent strain and potential leaks.
Timely Repairs: Address small issues promptly to prevent larger, costlier problems.
Insulation Upgrades: Improve insulation in colder climates to reduce strain and maintain consistent water temperatures.
Incorporating these practices into your home maintenance routine extends your water heater’s lifespan, ensuring efficient and safe operation. Regular water heater maintenance prevents the inconvenience and costs associated with major repairs or water heater leak damage.
Advanced Solutions and Considerations

Innovations in water heater technology, focusing on leak detection, energy efficiency, and construction materials, showcase the industry’s commitment to enhancing functionality and sustainability.
Leak Detection Systems
Companies like Rheem utilize EcoNet® technology in their water heaters, offering features like leak detection and auto shut-off, which send alerts to homeowners during leaks. Similarly, Moen’s Flo by Moen Smart Water Detector is designed for early leak detection near water heaters, ensuring timely notifications through a mobile app.
Energy-Efficient Water Heaters
Rinnai leads in energy conservation with its tankless water heaters that only heat water on demand, reducing energy usage. A.O. Smith also contributes to this trend with high-efficiency water heaters, including hybrid heat pump models and solar systems, focusing on green energy.
Advanced Construction Materials
Many water heater tank manufacturers employ advanced construction materials to enhance durability and prevent corrosion. For instance, Bradford White utilizes Vitraglas® lining in their tanks, which significantly extends the life of their water heaters by protecting against corrosion.
These advancements from key industry players optimize water heater performance and align with eco-friendly practices. Investing in such technologies ensures homeowners benefit from efficient, durable, and sustainable water heating solutions.
Conclusion

This comprehensive article addresses the multifaceted issue of hot water tank leaks, including causes such as aging, valve malfunctions, and pressure issues. We also highlight advanced solutions like smart leak detection and energy-efficient water heaters from companies like Rheem and Rinnai.
Phyxter Home Services is positioned as a key player in addressing these challenges, offering specialized expertise in modern water heating technologies and leak prevention strategies.
Explore our website’s additional articles for further insights into plumbing and home maintenance. Check our service coverage to confirm Phyxter’s availability in your area.
Choose Phyxter Home Services for reliable, informed, and cutting-edge solutions for your home’s plumbing needs, supported by authoritative industry knowledge. Visit Phyxter Home Services for comprehensive water heating system care.
[ad_2]
Source_link


