[ad_1]
Struggling with a jammed or non-responsive garbage disposal? Learning how to reset garbage disposal is a crucial skill for any homeowner, offering a quick fix to common kitchen sink issues. This guide provides step-by-step instructions, ensuring you can tackle the problem efficiently and safely, without the need for immediate professional help.
This article will cover the essentials of locating the reset button, troubleshooting tips for persistent issues, and preventative maintenance to avoid future disposal dilemmas. By the end, you’ll have the knowledge to reset your disposal and maintain its optimal performance, keeping your kitchen running smoothly.
Key Takeaways
- Common issues that may require a reset include a motor overload, jammed blades, or electrical disruptions. Recognizing these problems is crucial for effective troubleshooting.
- If resetting doesn’t resolve the issue or if there are persistent problems, experts recommend contacting a professional plumber or technician to inspect and repair the garage disposal.
- Preventative maintenance could involve avoiding certain materials, cleaning the disposal regularly, and being mindful of usage to prolong the unit’s lifespan.
Understanding the Reset Button

What is the Garbage Disposal Reset Button?
The Garbage Disposal Reset Button is a safety feature that comes into play when the disposal unit is under strain, like when grinding tough items or dealing with a blockage. This protective mechanism, known as the overload protector, kicks in to prevent potential damage to the appliance’s internal parts caused by excessive stress.
To restore proper functionality to the garbage disposal, you’ll need to find and press the reset button.
Where to Find the Reset Button
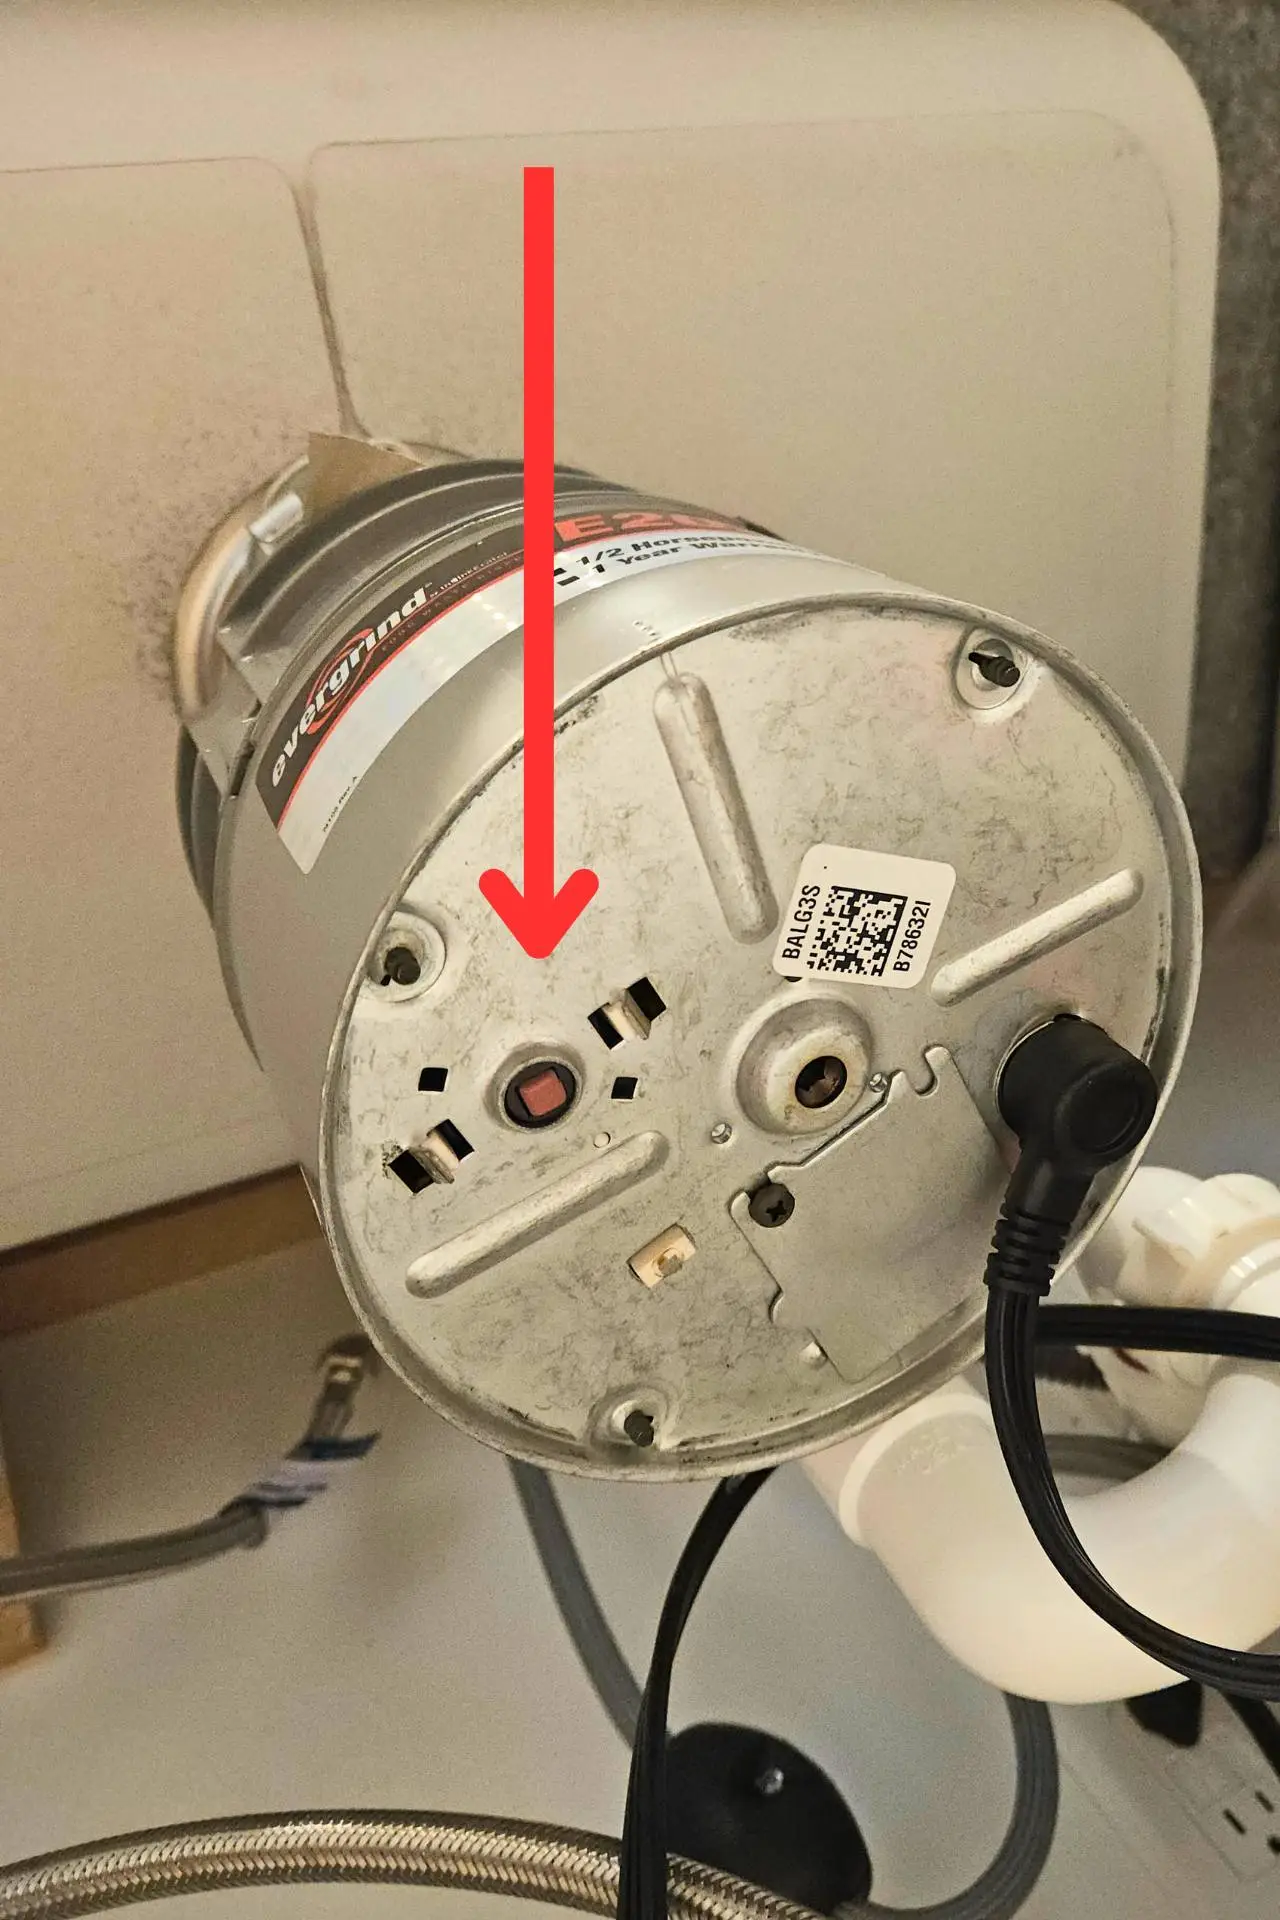
The little red reset button on the garbage disposal is typically located on or near the bottom of the unit, often on the underside. However, the specific location can vary among different models and brands.
The more popular brands, such as InSinkErator, Waste King, and Moen, have their reset buttons at the bottom of the disposal unit.
Remember that newer models or different product lines within a brand may have variations in design; some may have a black reset button, others may have a red button. Press this to reset the overload protector.
So, consulting the product documentation is the most reliable way to find the red reset button on your specific garbage disposal model.
Step-by-Step Guide to Resetting Your Garbage Disposal
Preparing to Reset
Turn off the power by locating the switch, usually on the wall or under the sink. This step is crucial for your safety while working on the appliance. If you can’t find the switch, it is prudent to physically unplug the unit if it is plugged into an electrical outlet.
If it has been running or has recently encountered a jam, wait for it to cool down before pressing the red button. This helps prevent any accidental burns or injuries.
Never attempt to reset or work on a garbage disposal without first turning off the switch or breaker. Failing to do so can result in serious injuries or electrical hazards. Always prioritize safety and follow the manufacturer’s guidelines for your specific model.
Resetting the Unit
Before you begin, turn off the power to the garbage disposal. Locate the dedicated wall switch or electrical outlet and switch it off, or unplug the cord and wait for the disposal to cool down if it has been running recently.
Shine a flashlight into the chamber and visually inspect for any visible obstructions or foreign objects. If you have a garbage disposal wrench or hex key, use it to rotate the blades about a quarter turn manually. This can help dislodge any stuck materials.
Push the reset button firmly; you should feel a click as the button engages. Some disposals may require pushing the reset button down for a few seconds.
Restore power using the wall switch or by plugging it back in.
Run cold water down the drain, then turn the garbage disposal on to see if it operates smoothly without any unusual noises or vibrations.
Avoid using excessive force on the reset button to avoid serious injury. If it doesn’t engage, a more significant issue may require professional assistance.
If problems persist, consider contacting the manufacturer’s customer support or a professional plumber for further guidance. Always follow the safety precautions outlined in the user manual, and if you’re unsure about any step, consult a professional for assistance.
Troubleshooting Common Issues
Identifying and Resolving Clogs
Common signs of clogged garbage disposal include slow draining, unpleasant odor, gurgling noises, water backing up into the sink, and other visible debris like coffee grounds.
Dropping a handful of ice cubes into the disposal and running it with water can help with clogs, and grinding citrus peels (lemons, oranges) in the disposal will help freshen it up.
You can also pour a mixture of baking soda and vinegar down the disposal, followed by boiling water. This creates a foaming action that helps break down organic materials and helps melt and flush away grease and soap residues.
When dealing with a clogged or stuck unit, insert the manufacturer’s supplied offset wrench into the bottom of the garbage disposal and manually rotate it back and forth to free up the impellers.
Addressing Electrical and Mechanical Failures
Power failure, where it doesn’t turn on at all, is one of the more common issues. Ensure it is plugged in or check if the circuit breaker has tripped at the electrical panel.
A faulty reset button could also be a problem. Inspect for damage before attempting a fix.
Also, watch for a faulty wire or switch with intermittent operation, flickering lights, or unusual sounds. Examine the wiring and switch for any visible damage. Ensure all connections are secure. If issues persist, consult an electrician.
Mechanical Issues:
Jammed blades can cause the disposal to make a humming noise, but don’t grind. Manually rotate an Allen wrench clockwise to remove any visible obstructions.
A motor overload where it frequently trips the reset button or the breaker. To avoid this, try to reduce the amount of waste fed into the garbage disposal at a time.
Water leakage under the sink. Check for loose connections, worn-out gaskets, or cracks in the disposal. Tighten connections and replace damaged components to address leakage.
Any grinding, squealing, or banging sounds during operation. Inspect the chamber for foreign objects. If the noises persist, there may be damage to the impellers or motor.
If you experience excessive vibration during operation, then check for loose mounting screws or bolts. If the unit is properly secured and vibration persists, this may require professional attention.
Other Issues
Many of these issues might be covered under a manufacturer’s warranty, but some are not. These include aging, seal integrity, and external blockage.
Aging causes a gradual decrease in performance, increased noise, or frequent resets.
Poor seal integrity can lead to persistent foul odors despite cleaning.
External debris blockage where the unit operates, but drainage is slow. Inspect the drainpipe on the bottom side and other plumbing for external debris or blockages. Clearing these may improve drainage without the need for complex repairs.
Always prioritize safety, turn it off before troubleshooting, and consider seeking professional assistance if issues persist. Regular maintenance and cautious operation can extend the lifespan of your garbage disposal.
When to Seek Professional Help

Facing electrical or plumbing issues with your garbage disposal, such as flickering lights, inconsistent operation, or frequent resets, necessitates professional intervention. Licensed electricians and skilled plumbers can swiftly diagnose and rectify these problems, ensuring safety and efficiency. Persistent leaks or unusual noises often indicate deeper issues that DIY efforts might not resolve, highlighting the importance of expert assistance.
Attempting repairs on a warranty-covered garbage disposal could void the warranty, making it crucial to consult professionals. Their expertise guarantees a proper fix and preserves the unit’s longevity and performance, ensuring your kitchen’s smooth operation. Prioritizing professional help is essential for complex issues beyond basic troubleshooting.
Maintenance Tips for Longevity
Regular maintenance is key to prolonging the lifespan of garbage disposals and preventing frequent issues.
- Always run cold water during operation and for a short time afterward. This helps solidify grease and fats, allowing them to be chopped up and easily flushed through the plumbing.
- Run it regularly, even if you don’t have large quantities of food waste. This helps prevent corrosion and ensures the rubber seals stay lubricated and functional.
- Refrain from putting hard materials like bones, fruit pits, or seafood shells into the garbage disposal. Also, cut large food items into smaller pieces to reduce the strain on the motor and blades.
- Fibrous foods like celery, corn husks, or artichokes can wrap around the shredder ring and cause jams. Dispose of fibrous waste in the compost or trash instead.
- Avoid pouring grease or oily substances down the drain, as these can solidify and lead to clogs.
- Use a mixture of baking soda and vinegar to clean and neutralize odors. Follow it up with a rinse of hot water. Alternatively, grind citrus peels to freshen up the disposal.
- Periodically inspect for any signs of leaks. Check underneath the disposal and address leaks promptly.
- Install a drain strainer or stopper in the sink to catch large food particles or non-food items like utensils or a wooden spoon and prevent them from entering the disposal.
By incorporating these practices into your routine, you can help ensure the longevity of your garbage disposal and reduce the likelihood of it not working properly.
Advanced Maintenance Techniques for Peak Garbage Disposal Performance

One lesser-known but effective technique for maintaining the sharpness and cleanliness of your garbage disposal is combining ice cubes and rock salt. This method not only helps in sharpening the blades but also assists in dislodging debris and breaking down grease.
Procedure:
Pour distilled white vinegar into an ice tray and freeze it. The vinegar helps to clean and disinfect, while the ice is used to sharpen the blades.
Once the vinegar ice cubes are frozen, transfer them to a bowl. Add a handful of rock salt to the bowl. Rock salt is abrasive and aids in cleaning and scrubbing the disposal components.
Turn on the garbage disposal and feed the frozen vinegar ice cubes and rock salt mixture into it.
After running the ice and rock salt through, flush it with water to remove any remaining debris. The cold water also helps solidify grease, making it easier to flush out.
Conclusion

In summary, effective garbage disposal maintenance ensures its longevity, prevents issues, and maintains a smoothly running kitchen.
Remember to flip the power switch, unplug the cord, or flip the breaker before working on the garbage disposal. Press the red button only when it is safe to do so, and please do not ever put your hand inside the disposal. Your finger isn’t a tool!
We encourage you to leverage these valuable insights and integrate them into your routine to maintain an efficient and trouble-free garbage disposal. For more expert tips and comprehensive guides on home maintenance, explore other plumbing articles by Phyxter Home Services. Let us help you create a more efficient, safe, and enjoyable living space.
[ad_2]
Source_link


